
Hello, today I’d like to describe a process of integration commonly used library for emulation action bar in old Android versions - ActionBarSherlock into maven - Eclipse project. In a result we’ll get a project with:
- support of Action Bar Sherlock
- support of integration tests as a separate project
- configured Maven build and release targets
- configured Eclipse for develop and debug
This is my first post, so don’t be too critical :)
At first let’s create empty Android mvn project. In order to complete this step we’ll need:
- JDK 1.6+ installed as required for Android development
- Android SDK installed r17+ , preferably with all platforms
- Maven 3.0.3+ installed
If you use Eclipse for development, you’ll also need:
- Eclipse with m2e plugin installed
At first let’s create Android project using akquinet android-archetypes. In a result, we’ll get a sample project with configured release targets and integration tests project. Copy following code to the terminal, replacing highligted lines with your values:
mvn archetype:generate \
 -DarchetypeArtifactId=android-release \
 -DarchetypeGroupId=de.akquinet.android.archetypes \
 -DarchetypeVersion=1.0.8 \
 -DgroupId=com.foo.bar \
 -DartifactId=my-android-project \
 -Dpackage=com.foo.bar.test \
 -Dplatform=16
Once generated, the application is ready to be built and tested. Start an Android emulator, or plug an Android dev phone, and execute:
cd my-android-project
mvn clean install
Besides your application, this commands will also install and execute integrations tests application.
Generated project goes with test keystore that could be used for test, but not for deploying to market, run this command to get signed apk:
mvn clean install -Prelease \
-Dsign.keystore=PATH_OF_THE_PROJECT/my-android-project/test-key.keystore \
-Dsign.alias=mykey \
-Dsign.storepass=testtest \
-Dsign.keypass=testtest
Now we need to download and add to our project dependencies ActionbarBarSherlock.
Latest version of the library always is available in the project download page. When it’s ready, unzip archive, copy library folder to your project root and rename it to actionbarsherlock:
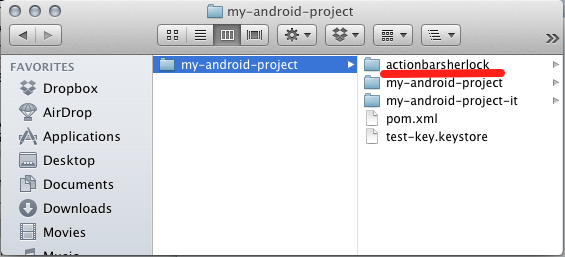
As it is stated on abs usage page the only thing we need - is to add this lines to my-android-project/my-android-project/pom.xml :
<dependency>
    <groupId>com.actionbarsherlock</groupId>
    <artifactId>actionbarsherlock</artifactId>
    <version>4.2.0</version>
    <type>apklib</type>
</dependency>
Also you need to extend HelloAndroidActivity from com.actionbarsherlock.app.SherlockActivity instead of android.app.Activity and change activity theme in AndroidManifest.xml to android:theme="@style/Theme.Sherlock". Checkout git patch file for details. Try to build app. From parent project folder execute:
mvn clean installYou’ll get following error:
[INFO] UNEXPECTED TOP-LEVEL EXCEPTION:
[INFO] java.lang.IllegalArgumentException: already added: Landroid/support/v4/app/Watson$OnCreateOptionsMenuListener;
[INFO]  at com.android.dx.dex.file.ClassDefsSection.add(ClassDefsSection.java:123)
[INFO]  at com.android.dx.dex.file.DexFile.add(DexFile.java:163)
[INFO]  at com.android.dx.command.dexer.Main.processClass(Main.java:486)
[INFO]  at com.android.dx.command.dexer.Main.processFileBytes(Main.java:455)
[INFO]  at com.android.dx.command.dexer.Main.access$400(Main.java:67)
[INFO]  at com.android.dx.command.dexer.Main$1.processFileBytes(Main.java:394)
[INFO]  at com.android.dx.cf.direct.ClassPathOpener.processArchive(ClassPathOpener.java:245)
[INFO]  at com.android.dx.cf.direct.ClassPathOpener.processOne(ClassPathOpener.java:131)
[INFO]  at com.android.dx.cf.direct.ClassPathOpener.process(ClassPathOpener.java:109)
[INFO]  at com.android.dx.command.dexer.Main.processOne(Main.java:418)
[INFO]  at com.android.dx.command.dexer.Main.processAllFiles(Main.java:329)
[INFO]  at com.android.dx.command.dexer.Main.run(Main.java:206)
[INFO]  at com.android.dx.command.dexer.Main.main(Main.java:174)
[INFO]  at com.android.dx.command.Main.main(Main.java:91)
[INFO] 1 error; aborting
[INFO] ------------------------------------------------------------------------
[INFO] Reactor Summary:
[INFO]
[INFO] my-android-project - Parent ....................... SUCCESS [0.394s]
[INFO] my-android-project - Application .................. SUCCESS [14.880s]
[INFO] my-android-project-it - Integration tests ......... FAILURE [9.501s]
[INFO] ------------------------------------------------------------------------
[INFO] BUILD FAILURE
[INFO] ------------------------------------------------------------------------
[INFO] Total time: 21.255s
[INFO] Finished at: Sun Nov 04 12:50:51 GMT+02:00 2012
[INFO] Final Memory: 15M/81M
[INFO] ------------------------------------------------------------------------
[ERROR] Failed to execute goal com.jayway.maven.plugins.android.generation2:android-maven-plugin:3.1.1:dex (default-dex) on project my-android-project-it: MojoExecutionException: ANDROID-040-001: Could not execute: Command = /bin/sh -c cd /Users/vitaliyzasadnyy/Development/workspaces/blog/my-android-project-parent/my-android-project-it && /System/Library/Java/JavaVirtualMachines/1.6.0.jdk/Contents/Home/bin/java -Xmx1024M -jar /Users/vitaliyzasadnyy/Development/SDKs/android-sdk-macosx/platform-tools/lib/dx.jar --dex --output=/Users/vitaliyzasadnyy/Development/workspaces/blog/my-android-project-parent/my-android-project-it/target/classes.dex /Users/vitaliyzasadnyy/.m2/repository/com/actionbarsherlock/actionbarsherlock/4.2.0/actionbarsherlock-4.2.0.apklib /Users/vitaliyzasadnyy/Development/workspaces/blog/my-android-project-parent/my-android-project/target/my-android-project-1.0-SNAPSHOT.jar /Users/vitaliyzasadnyy/Development/workspaces/blog/my-android-project-parent/my-android-project-it/target/classes /Users/vitaliyzasadnyy/.m2/repository/de/akquinet/android/androlog/androlog/1.0.5/androlog-1.0.5.jar /Users/vitaliyzasadnyy/.m2/repository/com/google/android/support-v4/r7/support-v4-r7.jar, Result = 1 -> [Help 1]
If you carefully take a look at the last error, you’ll notice that a problem is with generation2 goal. It uses dex tool from Android SDK to generate class files for Dalvik. During the execution, it includes actionbarsherlock and support-v4-r7 dependencies two times (second time like transitive dependency from our application project). Check out it --output parameter values (here is a bit formatted text from maven error):
/System/Library/Java/JavaVirtualMachines/1.6.0.jdk/Contents/Home/bin/java -Xmx1024M -jar /Users/vitaliyzasadnyy/Development/SDKs/android-sdk-macosx/platform-tools/lib/dx.jar --dex --output=
    /Users/vitaliyzasadnyy/Development/workspaces/blog/my-android-project-parent/my-android-project-it/target/classes.dex
    /Users/vitaliyzasadnyy/.m2/repository/com/actionbarsherlock/actionbarsherlock/4.2.0/actionbarsherlock-4.2.0.apklib
    /Users/vitaliyzasadnyy/Development/workspaces/blog/my-android-project-parent/my-android-project/target/my-android-project-1.0-SNAPSHOT.jar
    /Users/vitaliyzasadnyy/Development/workspaces/blog/my-android-project-parent/my-android-project-it/target/classes
    /Users/vitaliyzasadnyy/.m2/repository/de/akquinet/android/androlog/androlog/1.0.5/androlog-1.0.5.jar
    /Users/vitaliyzasadnyy/.m2/repository/com/google/android/support-v4/r7/support-v4-r7.jar
We can fix this error by adding actionbarsherlock and support-v4-r7 dependencies with scope provided to my-android-project-it/pom.xml:
<dependency>
    <groupId>com.google.android</groupId>
    <artifactId>support-v4</artifactId>
    <version>r7</version>
    <scope>provided</scope>
</dependency>
  <dependency>
     <groupId>com.actionbarsherlock</groupId>
     <artifactId>actionbarsherlock</artifactId>
     <version>4.2.0</version>
     <type>apklib</type>
     <scope>provided</scope>
</dependency>
Now project should build successfully.
Next step is to configurate eclipse. Rename parent folder of a project from my-android-project to my-android-project-parent.
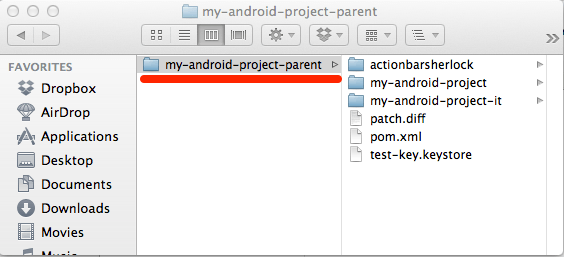
Open Eclipse, import my-android-project-parent using existing maven project wizard. As actionbarsherlock is not part of our parent maven project you’ll also need to import it as existing maven project (don't import it as Android library project!). After this steps you should have following project structure:
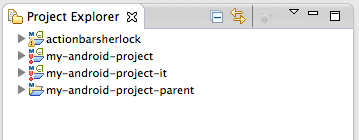
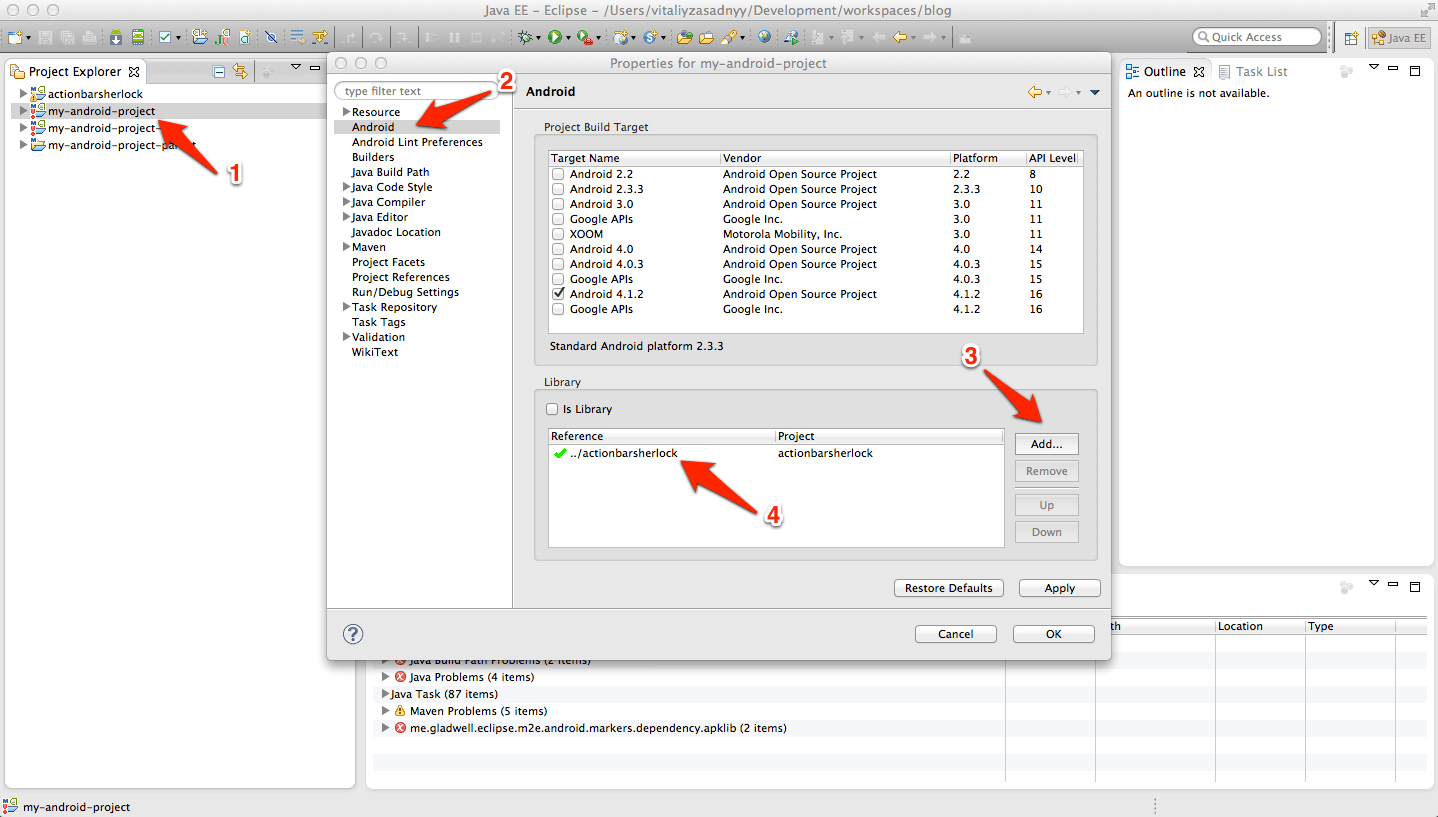
Let’s fix build path problems that we have.
- Go to
my-android-projectproperties - Open Android section
- Add
actionbarsherlockas a library by pressing Add button - Now you should see
actionbarsherlockin a library section
As we are using separate project for integration test, we should remove src/test/java folder from my-android-project and my-android-project-it build path:
- Go to
my-android-project(ormy-android-project-it) properties - Open Java Build Path section
- Under Sources tab select
src/test/javafolder - Press remove button
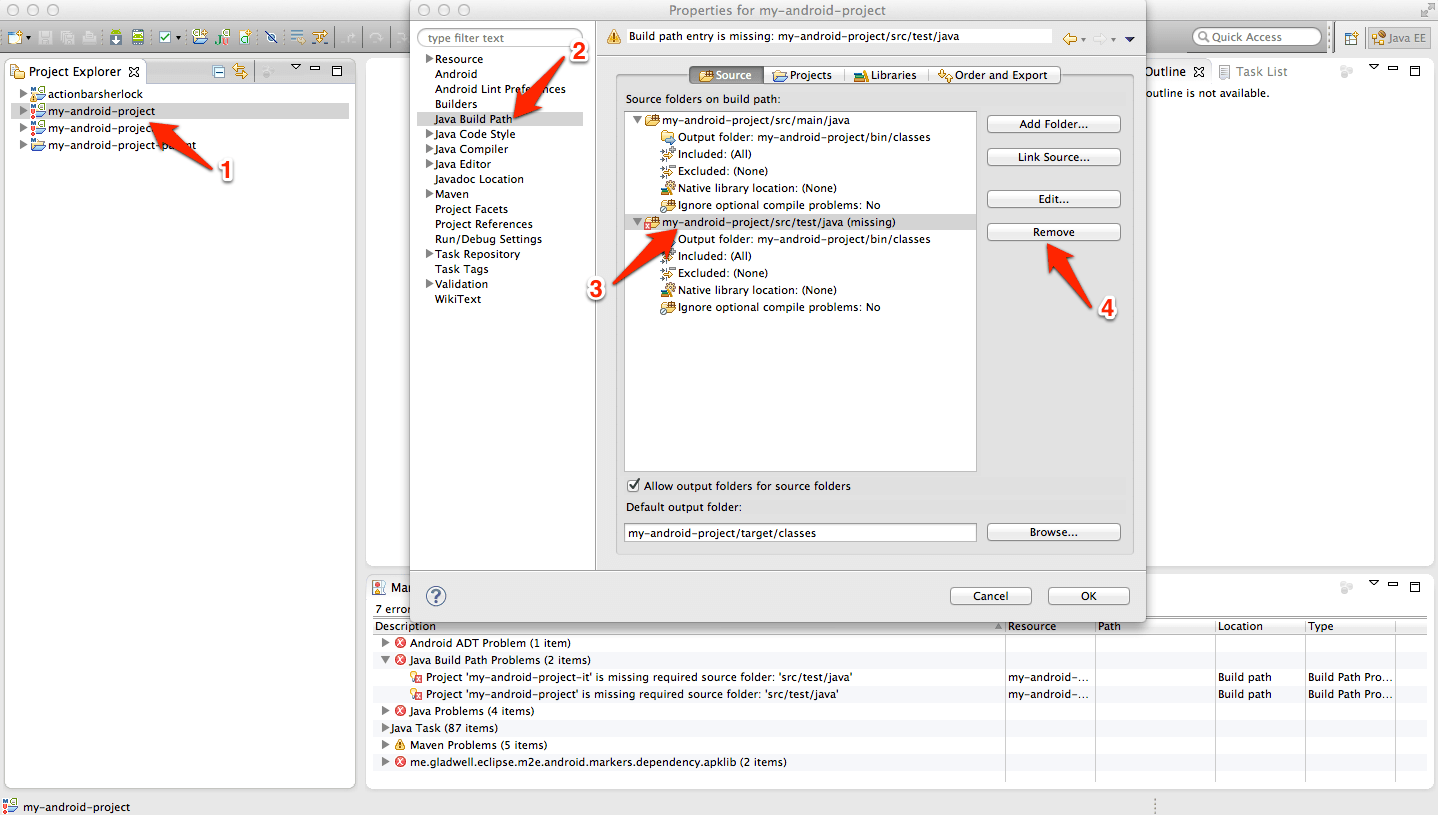
Now all errors from Eclipse markers view should disappear, and we can run our project. Select my-android-project and run it as Android application… but you’ll get:

In console view, you’ll find an error like this one:
[2012-11-04 14:22:26 - my-android-project] Conversion to Dalvik format failed with error 1
[2012-11-04 14:23:55 - my-android-project] Dx
UNEXPECTED TOP-LEVEL EXCEPTION:
java.lang.IllegalArgumentException: already added: Lorg/hamcrest/BaseDescription;
[2012-11-04 14:23:55 - my-android-project] Dx  at com.android.dx.dex.file.ClassDefsSection.add(ClassDefsSection.java:123)
[2012-11-04 14:23:55 - my-android-project] Dx  at com.android.dx.dex.file.DexFile.add(DexFile.java:163)
Remember our problem with maven configuration? Here we have quite the same issue with double inclusion. In order to fix it remove libs folder with android-support-v4.jar from actionbarsherlock project.
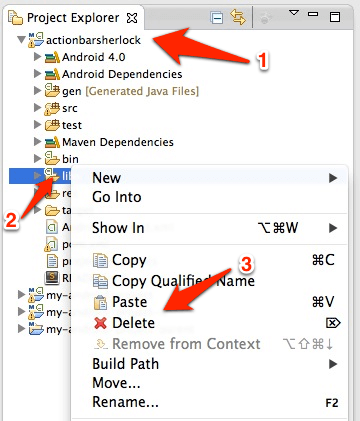
Finally, clean all projects and run my-android-project. We’ve got working application:

Sample project from post you can download here.
Hope this post was useful, if you have any notes or propositions how it can be improved, please write a comment.
Share with: LinkedIn • Twitter • Facebook
